
How to Build a Laravel MCP Server and Connect It to Claude
On this page
A Laravel MCP server lets Claude call functions in your app and answer questions using your real data. In this guide, you'll build one with a single tool, connect it to Claude Code on your machine, and then put it online with a proper login so it works in claude.ai.
Setting up the example app and running it locally takes about 10 to 12 minutes. Going online takes longer, because claude.ai's custom connectors sign in with OAuth, and that means adding Laravel Passport. We'll cover that part in detail, since it's where most people get stuck.
The finished project is on GitHub: laravel-mcp-claude. Clone it if you'd rather read the complete code first, or follow along and build it step by step.
What you'll need
- Laravel 12 (12.41.1 or newer) or Laravel 13
- PHP 8.2 or higher (8.3 or higher on Laravel 13)
- Node.js and npm, to build the app's front-end assets in Part 2
- Claude Code, for the local part
- A public server with HTTPS, for the online part
Last checked with laravel/mcp 1.0.1 and Laravel Passport 13.8 on Laravel 13.34 (PHP 8.4), October 2026.
How MCP works with Laravel
Model Context Protocol (MCP) gives AI apps a standard way to call tools on a server. Each tool has a name, a description, and a list of inputs it accepts. Claude reads the descriptions, decides when a tool is useful, sends the inputs, and gets your result back.
On the Laravel side, the official laravel/mcp package handles the protocol for you. You write each tool as a PHP class, list it on a server class, and register that server in a routes file.
What we're building
Our example is a small animal shelter app. It stores animals in an animals table with a name, species, breed, age, adoption status, and arrival date. We'll build a read-only server with one tool, GetAnimalTool, that looks up an animal by its ID.
After that, we'll connect it in two ways: locally, so Claude Code can use it, and online, so you can add it as a custom connector in claude.ai.
Set up the example app
Start with a fresh Laravel app. New Laravel apps use SQLite by default, so you can keep the default database settings:
composer create-project laravel/laravel laravel-mcp-claude
cd laravel-mcp-claude
Already have an app you'd rather use? You can skip ahead to Part 1, but change the fields the tool returns in Step 2 to match your own table.
Create the model and its migration:
php artisan make:model Animal -mOpen the new migration in database/migrations. Its file name starts with the date and time you ran the command, so yours will differ from the one below. Inside up(), replace the generated Schema::create block with this one:
Schema::create('animals', function (Blueprint $table) {
    $table->id();
    $table->string('name');
    $table->string('species');
    $table->string('breed');
    $table->unsignedTinyInteger('age');
    $table->string('status'); // available, reserved or adopted
    $table->date('arrived_at');
    $table->timestamps();
});
Then seed some animals in database/seeders/DatabaseSeeder.php: the import goes with the existing use statements, the insert inside its run() method, below the test user Laravel already creates there. On a fresh table, Biscuit ends up with ID 8, the animal Claude looks up in Step 4:
// Alongside the existing use statements
use Illuminate\Support\Facades\DB;

// Inside the run() method
DB::table('animals')->insert([
    ['name' => 'Luna', 'species' => 'Cat', 'breed' => 'Domestic Shorthair', 'age' => 3, 'status' => 'available', 'arrived_at' => '2026-05-14'],
    ['name' => 'Max', 'species' => 'Dog', 'breed' => 'Labrador Retriever', 'age' => 5, 'status' => 'adopted', 'arrived_at' => '2026-03-22'],
    ['name' => 'Pepper', 'species' => 'Cat', 'breed' => 'Siamese', 'age' => 1, 'status' => 'available', 'arrived_at' => '2026-07-03'],
    ['name' => 'Rocky', 'species' => 'Dog', 'breed' => 'German Shepherd', 'age' => 7, 'status' => 'reserved', 'arrived_at' => '2026-04-30'],
    ['name' => 'Mochi', 'species' => 'Rabbit', 'breed' => 'Holland Lop', 'age' => 2, 'status' => 'available', 'arrived_at' => '2026-07-19'],
    ['name' => 'Daisy', 'species' => 'Dog', 'breed' => 'Beagle', 'age' => 4, 'status' => 'adopted', 'arrived_at' => '2026-02-11'],
    ['name' => 'Oliver', 'species' => 'Cat', 'breed' => 'Maine Coon', 'age' => 6, 'status' => 'available', 'arrived_at' => '2026-06-25'],
    ['name' => 'Biscuit', 'species' => 'Dog', 'breed' => 'Corgi', 'age' => 2, 'status' => 'available', 'arrived_at' => '2026-08-12'],
]);
Then create the table and load the animals:
php artisan migrate --seedIf you've seeded this app before, run php artisan migrate:fresh --seed instead. It rebuilds the database from scratch, so the test user isn't created twice.
Part 1: Run it locally
Step 1: Install laravel/mcp
composer require laravel/mcp
php artisan vendor:publish --tag=ai-routes
The second command creates routes/ai.php, which is where you register MCP servers. It lives next to your web and API routes but stays separate from them.
Step 2: Add a tool
php artisan make:mcp-tool GetAnimalToolEvery tool has three parts: a description, a handle() method, and a schema() method.
<?php

namespace App\Mcp\Tools;

use App\Models\Animal;
use Illuminate\Contracts\JsonSchema\JsonSchema;
use Laravel\Mcp\Request;
use Laravel\Mcp\Response;
use Laravel\Mcp\ResponseFactory;
use Laravel\Mcp\Server\Attributes\Description;
use Laravel\Mcp\Server\Tool;
use Laravel\Mcp\Server\Tools\Annotations\IsReadOnly;

#[Description('Get one shelter animal by its ID: name, species, breed, age, adoption status and the date it arrived.')]
#[IsReadOnly]
class GetAnimalTool extends Tool
{
    // Runs when Claude calls the tool. Think of it like a controller method.
    // structured() returns a ResponseFactory, error() a plain Response, so the return type allows both
    public function handle(Request $request): Response|ResponseFactory
    {
        $validated = $request->validate(
            ['id' => 'required|integer'],
            ['id.required' => "You must provide an animal ID (a whole number). If you don't know it, ask the user which animal they mean."]
        );

        $animal = Animal::find($validated['id']);

        if (! $animal) {
            return Response::error("No animal found with ID {$validated['id']}.");
        }

        return Response::structured([
            'name' => $animal->name,
            'species' => $animal->species,
            'breed' => $animal->breed,
            'age' => $animal->age,
            'status' => $animal->status,
            'arrived_on' => $animal->arrived_at,
        ]);
    }

    // The inputs Claude is allowed to send
    public function schema(JsonSchema $schema): array
    {
        return [
            'id' => $schema->integer()
                ->description('The animal ID.')
                ->required(),
        ];
    }
}
Start with the description, because Claude reads it to decide when to call the tool. A vague one means Claude either skips the tool or calls it at the wrong moment, so list exactly what comes back.
Next, handle() holds your logic, much like a controller method. Validate the input as you would in a controller, since Claude is still an outside caller. Write your error messages for Claude as well. When validation fails, Claude reads your message and tries again. That's why the error message above spells out what to send, and tells Claude to ask the user rather than guess an ID.
The result goes back through Response::structured(), which sends the animal's details as named fields that Claude can read reliably, rather than one block of text.
Finally, schema() defines the inputs and tells Claude what to send and in what format. The #[IsReadOnly] attribute tells AI clients that this tool doesn't change anything in your app.
Step 3: Create the Laravel MCP server
php artisan make:mcp-server ShelterServerThis creates app/Mcp/Servers/ShelterServer.php. Give it a name, a version, and instructions, and list the tool from Step 2:
<?php

namespace App\Mcp\Servers;

use App\Mcp\Tools\GetAnimalTool;
use Laravel\Mcp\Server;
use Laravel\Mcp\Server\Attributes\Instructions;
use Laravel\Mcp\Server\Attributes\Name;
use Laravel\Mcp\Server\Attributes\Version;

// Name, version and instructions are shown to Claude when it connects
#[Name('Shelter Server')]
#[Version('0.0.1')]
#[Instructions('Read-only access to shelter animal records.')]
class ShelterServer extends Server
{
    // Only tools listed here are visible to Claude
    protected array $tools = [
        GetAnimalTool::class,
    ];
}
Claude sees these three attributes as soon as it connects. Keep the instructions short, and be honest about what the server can and can't do.
Step 4: Connect it to Claude Code
Register the server as a local server in routes/ai.php:
use Laravel\Mcp\Facades\Mcp;

Mcp::local('shelter', \App\Mcp\Servers\ShelterServer::class);
From your project root, tell Claude Code how to start it:
claude mcp add shelter -- php artisan mcp:start shelterYou won't need to run mcp:start yourself, since Claude Code starts the server when it needs it. Open Claude Code from your project folder and type /mcp. You should see shelter listed as connected, along with its tool count.

Now ask it something:
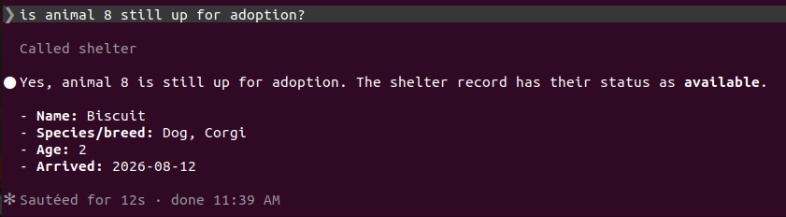
is animal 8 still up for adoption?
Claude calls GetAnimalTool (listed as get-animal-tool, since Laravel MCP names tools after their class) with an ID of 8, reads the result from your database, and answers with the animal's name, breed, and status.
Part 2: Put it online
Step 5: Choose how to authenticate
A local server only runs on your machine. For claude.ai, it needs a public URL. Add a web route below the local one in routes/ai.php, and keep the local line so Claude Code still works on your machine:
Mcp::local('shelter', \App\Mcp\Servers\ShelterServer::class);

// The same server over HTTP, for claude.ai
Mcp::web('/mcp', \App\Mcp\Servers\ShelterServer::class);
Once that's deployed, anyone who finds the URL can call your tools, so it needs a login.
Laravel MCP supports Sanctum, and if you only use Claude Code, a Sanctum token sent as a Bearer header works fine. claude.ai handles things differently. Its custom connectors sign you in with OAuth: they find your login, register themselves as an app, send you through a sign-in and approval screen, and then use the token they receive. Since Sanctum has no OAuth support, you'll need Laravel Passport for this part. It works with your existing users table.
Step 6: Install Passport
php artisan install:api --passportThis command publishes and runs the migrations and creates the encryption keys in storage/oauth-private.key and storage/oauth-public.key. It also adds five tables to your database. To make sense of them, think of an access token as a badge that Claude shows on every request:
| Table | What it holds |
|---|---|
oauth_clients | Which apps may connect. claude.ai registers itself here. |
oauth_auth_codes | A one-time code created when you click Authorize, swapped for a badge seconds later |
oauth_access_tokens | The badges themselves |
oauth_refresh_tokens | Lets an app renew an expired badge without you approving again |
oauth_device_codes | For logins on devices without a browser. This guide doesn't use it. |
Next, update your User model. Add the two Passport imports, the OAuthenticatable contract, and the HasApiTokens trait, keeping everything that's already there:
// Alongside the existing use statements
use Laravel\Passport\Contracts\OAuthenticatable;
use Laravel\Passport\HasApiTokens;

// Add implements OAuthenticatable to the class line
class User extends Authenticatable implements OAuthenticatable
{
    // Add HasApiTokens to the traits already there
    use HasApiTokens, HasFactory, Notifiable;

    // ...the rest of the model stays the same
}
Then add an api guard in config/auth.php. This guard checks who is making each request:
'guards' => [
    'web' => [
        'driver' => 'session',
        'provider' => 'users',
    ],

    'api' => [
        'driver' => 'passport',
        'provider' => 'users',
    ],
],
Step 7: Add the OAuth routes and protect /mcp
Back in routes/ai.php, make two changes: add the OAuth routes above your web route, and put the web route behind Passport's auth:api middleware. Your file now looks like this:
<?php

use Laravel\Mcp\Facades\Mcp;

Mcp::local('shelter', \App\Mcp\Servers\ShelterServer::class);

// Login addresses claude.ai reads to find where to sign in
Mcp::oauthRoutes();

// The same server over HTTP, for claude.ai
Mcp::web('/mcp', \App\Mcp\Servers\ShelterServer::class)
    // Only requests with a valid token get through
    ->middleware('auth:api');
The Mcp::oauthRoutes() line registers the /.well-known/... discovery addresses that claude.ai reads to find your login. It also adds a single mcp:use scope, which is the permission Claude asks for when it connects.
With auth:api in place, any request without a valid token gets a 401 response. Rather than a dead end, that 401 is what tells claude.ai to start the login flow.
Step 8: Add a sign-in page and an approval screen
When claude.ai sends you to log in, you land on the domain where your Laravel app runs. Passport's approval screen only appears if you're already signed in on that domain, so it needs a login page.
If your Laravel app already has one, you're set. If it's API-only (with a separate JavaScript frontend, for example), you'll need to add a simple sign-in page on the Laravel side. Many people miss this step.
A fresh Laravel app doesn't have one either. Here's the smallest version that works: two routes in routes/web.php and a plain form.
// Alongside the existing use statements
use Illuminate\Http\Request;
use Illuminate\Support\Facades\Auth;

// Below the existing routes
// Passport sends signed-out users here before the approval screen
Route::get('/login', fn () => view('login'))->name('login');

Route::post('/login', function (Request $request) {
    $credentials = $request->validate([
        'email' => 'required|email',
        'password' => 'required',
    ]);

    if (Auth::attempt($credentials)) {
        $request->session()->regenerate();

        // Back to the approval screen the user came from
        return redirect()->intended('/');
    }

    // Wrong details: back to the form with an error
    return back()->withErrors(['email' => 'Wrong email or password.'])->onlyInput('email');
})->middleware('throttle:5,1');
The throttle:5,1 middleware allows five sign-in attempts a minute, since this page is now a public entry point. Then create the form the first route shows:
<!DOCTYPE html>
<html lang="en">
<head>
    <meta charset="utf-8">
    <meta name="viewport" content="width=device-width, initial-scale=1">
    <title>Sign in</title>
</head>
<body>
    <h1>Sign in</h1>

    <form method="POST" action="/login">
        @csrf

        <p>
            <label for="email">Email</label><br>
            <input id="email" type="email" name="email" value="{{ old('email') }}" required autofocus>
        </p>

        <p>
            <label for="password">Password</label><br>
            <input id="password" type="password" name="password" required>
        </p>

        @error('email')
            <p>{{ $message }}</p>
        @enderror

        <button type="submit">Sign in</button>
    </form>
</body>
</html>
To check it, start the app with php artisan serve, open http://127.0.0.1:8000/login and sign in with the test user Laravel's seeder created: [email protected], password password. You should land on Laravel's welcome page, since you opened the form directly.
Next, set up the approval screen people see after signing in. Laravel MCP ships a ready-made view for it, so publish it:
php artisan vendor:publish --tag=mcp-viewsThen point Passport at it in AppServiceProvider:
// Alongside the existing use statements
use Laravel\Passport\Passport;

// Inside boot()
Passport::authorizationView(fn ($parameters) => view('mcp.authorize', $parameters));
The approval screen uses the color names from Laravel's starter kits. A fresh app doesn't define them yet, so add them below what's already in resources/css/app.css. If your app started from a starter kit, it already has them and you can skip this block:
/* Colors the mcp/authorize view expects, taken from Laravel's starter kits */
@custom-variant dark (&:is(.dark *));

@theme inline {
    --color-background: var(--background);
    --color-foreground: var(--foreground);
    --color-card: var(--card);
    --color-card-foreground: var(--card-foreground);
    --color-primary: var(--primary);
    --color-primary-foreground: var(--primary-foreground);
    --color-muted: var(--muted);
    --color-muted-foreground: var(--muted-foreground);
    --color-accent: var(--accent);
    --color-accent-foreground: var(--accent-foreground);
    --color-border: var(--border);
    --color-input: var(--input);
    --color-ring: var(--ring);
}

:root {
    --background: oklch(1 0 0);
    --foreground: oklch(0.145 0 0);
    --card: oklch(1 0 0);
    --card-foreground: oklch(0.145 0 0);
    --primary: oklch(0.205 0 0);
    --primary-foreground: oklch(0.985 0 0);
    --muted: oklch(0.97 0 0);
    --muted-foreground: oklch(0.556 0 0);
    --accent: oklch(0.97 0 0);
    --accent-foreground: oklch(0.205 0 0);
    --border: oklch(0.922 0 0);
    --input: oklch(0.922 0 0);
    --ring: oklch(0.87 0 0);
}

.dark {
    --background: oklch(0.145 0 0);
    --foreground: oklch(0.985 0 0);
    --card: oklch(0.145 0 0);
    --card-foreground: oklch(0.985 0 0);
    --primary: oklch(0.985 0 0);
    --primary-foreground: oklch(0.205 0 0);
    --muted: oklch(0.269 0 0);
    --muted-foreground: oklch(0.708 0 0);
    --accent: oklch(0.269 0 0);
    --accent-foreground: oklch(0.985 0 0);
    --border: oklch(0.269 0 0);
    --input: oklch(0.269 0 0);
    --ring: oklch(0.439 0 0);
}

@layer base {
    *,
    ::after,
    ::before {
        border-color: var(--color-border);
    }
}
Then build your app's front-end assets, which the approval screen loads:
npm install
npm run build
Step 9: Connect Claude Code to your app
Before deploying, check that the whole sign-in flow works on your own machine. Start the app and leave it running:
php artisan serveIn another terminal, from your project folder, register the web server with Claude Code. Give it a different name from the local shelter server, so you can tell the two apart:
claude mcp add --transport http shelter-web http://127.0.0.1:8000/mcpStart Claude Code in the same folder and type /mcp. shelter-web shows as needing authentication, which is the 401 from Step 7 doing its job. Select it and choose Authenticate.
Your browser opens your sign-in page. Sign in with the test user, and you'll see the approval screen from Step 8. It names the app that's connecting:
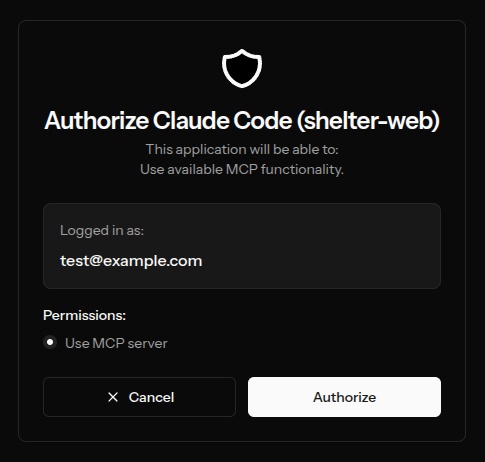
Click Authorize. The browser confirms the sign-in, and back in Claude Code, /mcp lists shelter-web as connected and authenticated, with 1 tool.
Ask the same question as in Step 4:
is animal 8 still up for adoption?
This time Claude calls shelter-web, so the answer comes over HTTP, using the token Passport just issued for your test user. When you connect from claude.ai in Step 12, you'll go through the same sign-in and approval screens, with claude.ai's name on the approval screen instead.
Step 10: Lock it down before you deploy
Once your server is online, it tells any client where to sign in. That's how claude.ai finds your login, but it also means anyone scanning for MCP servers can find yours. You can't hide it, so the setup itself has to hold up. Check these before going live.
First, decide who can use each tool. On the web route, auth:api guarantees a logged-in user, so you can run a normal authorization check inside handle():
public function handle(Request $request): Response|ResponseFactory
{
    // A user is only missing when running locally through Claude Code
    if ($request->user() && ! $request->user()->can('view-animals')) {
        return Response::error('Permission denied.');
    }

    // ...the rest of handle() from Step 2
}
The check uses a gate called view-animals, which you define in AppServiceProvider. This one lets any user with a verified email through. Swap in your own rule, such as an admin flag or a staff role:
// Alongside the existing use statements
use App\Models\User;
use Illuminate\Support\Facades\Gate;

// Inside boot(), below what's already there
Gate::define('view-animals', fn (User $user) => $user->hasVerifiedEmail());
The check relies on the auth:api middleware from Step 7: on the web route it guarantees a signed-in user, so the check always runs. Without that middleware, a request with no user would skip it, so keep the two together.
Second, shorten the token lifetime and rate-limit the MCP endpoint. Passport tokens last one year by default, which is long for something an AI client holds onto, and the endpoint itself should cap how often it can be called. Both go in AppServiceProvider, next to the approval view from Step 8:
// Alongside the existing use statements (Passport is already imported from Step 8)
use Carbon\CarbonInterval;
use Illuminate\Cache\RateLimiting\Limit;
use Illuminate\Support\Facades\RateLimiter;

// Inside boot(), below what's already there
Passport::tokensExpireIn(CarbonInterval::days(15));
Passport::refreshTokensExpireIn(CarbonInterval::days(30));

RateLimiter::for('mcp', fn ($request) => Limit::perMinute(60)
    ->by($request->user()?->id ?: $request->ip()));
Then apply the limiter to the web route from Step 7:
Mcp::web('/mcp', \App\Mcp\Servers\ShelterServer::class)
    ->middleware(['auth:api', 'throttle:mcp']);
Also, watch your other API routes. auth:api accepts any valid Passport token, including the ones Claude gets for MCP. If /mcp is the only route behind auth:api, MCP tokens can't reach anything else. In this app, that means deleting the GET /api/user route that install:api added to routes/api.php in Step 6.
If your app's own API also uses auth:api, protect those routes with a scope MCP tokens don't have (they only carry mcp:use), using Passport's CheckToken middleware. See Checking Scopes in the Passport docs.
Beyond that, keep tool responses to data you'd be comfortable showing publicly, at least at the start.
Step 11: Deploy to a server
The Passport keys you created in Step 6 are saved in the storage directory and gitignored, so they don't travel with your code. Generate them on the server with php artisan passport:keys, or load them from the PASSPORT_PRIVATE_KEY and PASSPORT_PUBLIC_KEY environment variables. With zero-downtime deploys that use separate release directories, share storage between releases so the keys survive each deploy.
On the server, run php artisan migrate so the OAuth tables exist in production.
Also, the URL has to be public and use HTTPS. Claude connects to custom connectors from Anthropic's cloud rather than your own device, so a localhost or VPN-only address won't work.
Step 12: Add the connector in claude.ai
On a Free, Pro or Max plan, go to Customize > Connectors and click "Add custom connector". On Team and Enterprise plans, an Owner adds it under Organization settings > Connectors. Give it a name, then paste your MCP URL:
https://api.example.com/mcpclaude.ai checks your server and selects "Sign in now" and "Register automatically" on its own. Leave them as they are and click Add.
From there, the flow runs in this order:
- claude.ai calls
/mcp, gets a 401, and finds where to sign in - It registers itself as a client, which adds a row to
oauth_clients - Your sign-in page opens. You log in and click Authorize
- claude.ai stores the token and sends it with every request after that
You can now ask questions from claude.ai the same way you did in Claude Code. The first time Claude uses the tool, it asks for your permission.
Why this example stays read-only
Every tool you expose is something an AI can call on your behalf. A lookup that returns an animal's adoption status can't do much damage if something goes wrong. Get the login and permissions right first, and add tools that change data once you trust the setup. When you do, give each one a clear description, strict validation, and its own authorization check.
Files you touched
routes/ai.php: registers the server locally and online, plus the OAuth routesapp/Mcp/Servers/ShelterServer.php: name, version, instructions, and the list of toolsapp/Mcp/Tools/GetAnimalTool.php: description,handle(),schema()config/auth.php: theapiguard using Passportapp/Models/User.php:OAuthenticatableandHasApiTokensAppServiceProvider.php: the approval view, theview-animalsgate, token lifetimes, and themcprate limiterresources/css/app.css: the colors the approval screen uses, if your app didn't have themroutes/web.phpandresources/views/login.blade.php: the sign-in page, if your Laravel app didn't have oneroutes/api.php: the/api/userrouteinstall:apiadded, removed
You'll find every one of these files in the example repo.
Go deeper
Want to sharpen your Laravel skills beyond the basics? Compare the Laravel courses on Tudlora.
Frequently Asked Questions
Not without upgrading. The laravel/mcp package needs Laravel 12.41.1 or newer, or Laravel 13, because one of its dependencies only supports those versions.
You don't. A local server that Claude Code starts needs no login at all. If you put the server online but only connect from Claude Code, you can protect /mcp with Sanctum's auth:sanctum middleware instead and send a token as a Bearer header. Passport comes in for claude.ai's custom connectors, which sign each user in with OAuth.
Your server will, since MCP is an open standard that any compatible client can connect to. Login support differs between clients, though, so check whether yours handles OAuth before you deploy.
Restart Claude Code, or reconnect the connector in claude.ai, so Claude loads the latest tool list. If it still doesn't appear, check the server on its own by running php artisan mcp:inspector <server-name>, using the name you registered in routes/ai.php. It opens a browser-based tool that lists your tools and lets you call them directly.
They can. Write tools work the same way as read tools, but they need stricter validation and an authorization check in every handle() method. Start with read-only tools until your login and permissions are solid.